Goat Hoof Trimming
Introduction: Regular hoof trimming is an essential part of raising small
ruminants. Depending on the environment the sheep or goats live in and the diet
they are fed, some animals require that their feet be trimmed every 6 weeks to 2
months. A minimum of 2-3 times a year is essential for almost all animals no
matter their diet or environment. Animals that are fed a high energy and protein
diet tend to have hooves that grow more rapidly. Animals that have access to
hard surfaces and play areas will naturally wear down the hoof and require less
frequent trimmings. Some small ruminant owners will feed on a roughened concrete
surface to help the hooves naturally wear down. Care should be taken to avoid
trimming feet of ewes/does during late gestation.
Sheep and goats that are kept in damp, muddy environments and do not have
their feet trimmed regularly are very prone to foot problems, such as footrot
and footscald. Animals that have excessive hoof growth are also very susceptible
to laminitis, joint/tendon problems, and arthritis. If the foot is left
neglected for extended periods of time, permanent damage can result. Dry
conditions can make hooves difficult to trim. To soften hard or dry, brittle
hooves, animals can be allowed to stand in a wet area for 2 to 3 hours before
trimming. Water softens the hoof and makes it easier to trim.
How to Trim the Feet:
Step #1: The sheep or goat should be properly restrained. For sheep this
usually means placing them on their rump. Goats, however, should be trimmed
while in a standing position. Goats should have their heads tied to a secure
place, preferably on a wall or fence. This allows the person doing the trimming
to stand to the outside of the goat and gently push the goat up against the
fence or wall for extra control when needed.
The most common method of restraining sheep is to place them on their rumps
and hold them in the shearing position. This procedure can be accomplished by
standing on the sheep’s left side, holding the jaw with the left hand and
placing the right hand on the animal’s hip. Hold the jaw tightly and bend the
sheep’s head sharply over its right shoulder. At the same time, press down on
the animal’s right hip. When the sheep falls to the ground, raise the front feet
and head so the sheep rests on its rump and leans off center of the tail bone
and against the person doing the trimming. If a large number of sheep are to be
processed, a bale of hay can serve as a rest during trimming.
A second method of restraint is to use a tilting squeeze table. The animal is
rotated on its side while being restrained. This equipment requires added
expense, but offers easy access to the animal’s feet. Care must be observed,
however, to avoid being kicked. A third method employs the use of a
commercially-made sheep deck chair. This “beach” type chair is adjustable and
holds the sheep on its dock comfortably and allows the operator the flexibility
of having both hands free to concentrate on feet trimming rather than having to
use one hand for restraining.
I use these trimmers, with a slightly rounded tip

The feet of a goat can be picked up from many different positions. Commonly,
the person doing the trimming will stand on the same side as the foot they are
trimming. The hind legs are often brought back straight behind the goat.
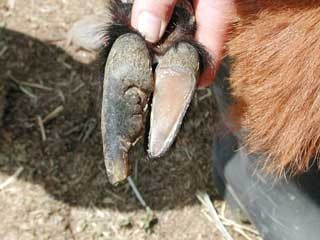
Step #2: The overall goal of the trimming process should be to make the
foot match the angle of the coronary band (see figure #4). After trimming, the
bottom of the foot and the coronary band should be parallel. Many foot trimmers
start by trimming the ends of the dew claws (see figure #2). This removes any
sharp points or extensions that can be caught on objects or injure the foot. A
pair of hoof trimmers or a sharp pair of rose trimmers should be used.
Step #3: The toe region should then be examined while removing any excess
debris. The toe and outside hoof wall are trimmed down to the where fresh sole
can be seen and the bottom of the foot is parallel to the coronary band (see
figure #4). When learning how to trim, begin by taking very small amounts of
hoof wall and toe off at a time. If the trimming goes too deep, the
sensitive structures of the foot can be injured. This can lead to excessive
bleeding, pain, lameness, and infections. If the foot is trimmed too deep, the
bleeding can be stopped by holding the foot and applying some blood-stop powder.
The foot should be kept clean and free of debris for the next few days. This
will help prevent infections and possible problems with tetanus. A tetanus
booster should also be given if the bleeding is significant.
Step #4: The inside wall of the foot can also be trimmed. It should be
trimmed a little bit lower than the outside wall. This allows most of the
animal’s weight to be on the outside hoof wall where it should be placed
naturally. The heel regions can also be trimmed when needed. A plane is
sometimes used to help even up the surfaces and remove any dead sole.
Step #5: A similar procedure is then done on the opposite claw. Once the
entire process is finished, the foot should be released and examined for proper
balance while the foot is bearing weight. Again, the bottom of the foot should
be parallel to the coronary band. The toes should not be left too long; if left
too long, the animal will rock backwards on the foot and cause unnecessary
stress on the flexor tendons. If the toes are trimmed too short, the fetlock may
“break forward” in an abnormal position.
* When learning how to trim feet, begin by removing small amounts of hoof
wall at a time. Go slow and take the time necessary to let the foot down and
check the balance of the foot. Removing small amounts and taking time to check
balance on the foot will help reduce the chances of over-trimming and entering
the sensitive structures of the foot.
 |
|
 |
|
 |
|
i
 |
|
 |
|
 |
|